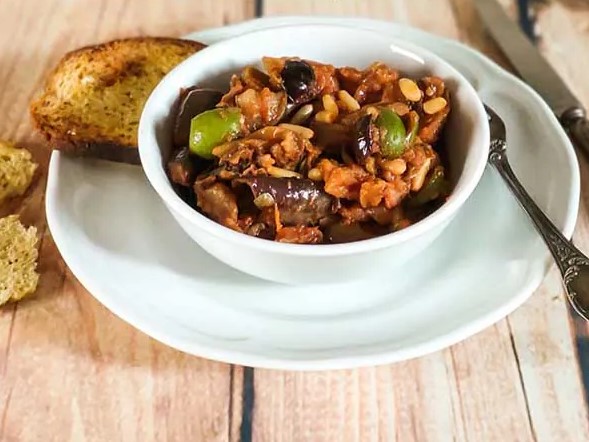
Caponata
traditional Sicilian dishThe first mention of caponata dates back to 1709.
In Sicily, the origin of the caponata recipe can be traced back to the word “capone”, which means “lampuga” in the Sicilian dialect. It’s a fish with lean and precious meat, once served at aristocratic tables and seasoned with sweet and sour sauce.
Poor people who did not have this fish, or could not afford it, found that eggplant was an excellent substitute. Thus, giving life to the recipe for caponata.
Ingredients:
- 3 large eggplants
- 1 large white onion
- 2 celery stalks
- 100 g (3/4 cup) of salted capers
- 200 g (1 cup) of green pitted olives
- 50 g (3 tablespoons) of pine nuts
- 150 ml (2/3 cup) of tomato passata
- 4 tablespoons of extra virgin olive oil
- 60 ml (1/4 cup) of white wine vinegar
- 2 teaspoons of sugar
- vegetable oil for frying (such as peanut or canola oil)
- 1 tablespoon of coarse salt
- fine salt and ground black pepper
- First, get all the ingredients ready. Cut the eggplants into small cubes and place them in a colander.
Sprinkle them with the coarse salt and let them drain for at least 30 minutes.
In this way the eggplants lose their water, which gives them a slightly bitter taste. - Then clean and slice the onion. Set aside.
Finally, dice the celery and place in a saucepan of boiling water (with 1/2 teaspoon of fine salt) and cook for 5 minutes. Drain and set aside. - Now desalt the capers. Wash them in cold water to remove the salt, dry and set aside.
Toast the pine nuts in a frying pan for 1 or 2 minutes. - Meanwhile, make the sweet and sour sauce. Mix the vinegar and sugar in a bowl and set aside.
Now it’s time to fry the eggplants. First rinse them with plenty of cold water. Then dry them with a kitchen towel. - Heat the oil in a frying pan with a high side, add a few eggplants at a time and fry for a few minutes.
When golden brown, drain with a skimmer and place on a tray lined with absorbent paper to remove excess oil, then set aside. - Now that all the ingredients are ready, start cooking the authentic caponata recipe.
Pour the extra virgin olive oil into a large saucepan. Heat it and add the onion. Sauté until the onion is soft and golden, then add the celery and capers. Stir and cook over medium heat for a few minutes. - Now add the olives and pine nuts. Finally add the tomato passata.
- Stir, cover and simmer over low heat for 20 minutes.
After this time, add a pinch of salt (if necessary, just taste it!) and then the sweet and sour sauce.
Increase the heat to medium, stir and cook until the vinegar scent has evaporated (about 2 or 3 minutes). - Turn off the heat and add the fried eggplants.
Mix well. Your authentic caponata recipe is ready!
Place the caponata in a baking pan and leave to cool at room temperature (or in the refrigerator).
The peculiarity of caponata is that it must be served COLD.
Even better if you make it the day before and eat it the next day!
Why Salt Eggplant Before Cooking?
Eggplant is known to absorb a lot of oil when fried or cooked, making them heavy and greasy. To prevent this, you can salt eggplant pieces before cooking. Salting removes excess moisture from the eggplant flesh, causing it to collapse and release some of its water content.
This reduces the amount of oil the eggplant absorbs during cooking, making it lighter and less greasy. In addition, the salt can also improve the flavor and texture of the eggplant by removing any bitterness.
To salt eggplant, chop it and sprinkle a little salt over it. Let the salted eggplant sit for at least 30 minutes to allow the salt to draw out excess moisture. Rinse the eggplant slices thoroughly under running water to remove any excess salt, then pat dry with a paper towel or clean cloth before cooking.
How to Serve Caponata?
A popular way to serve caponata is as an appetizer or side dish. In Italy, it’s usually served cold or at room temperature, making it a great option for a summer party or picnic. To serve it this way, simply place the caponata in a bowl or on a platter. You can even garnish it with fresh herbs like parsley or basil.
Another way to serve caponata is as a main dish. You can mix it with pasta, serve it with grilled chicken or fish, or even use it as a topping for bruschetta.
Caponata alla Palermo
The traditional Caponata of Palermo includes eggplant, celery, onions, capers, olives and tomato passata. It’s often served as a side dish or on bread.Caponata alla Catania
Caponata from Catania includes the same ingredients as the Palermo version, but with the addition of yellow and red peppers.Caponata alla Trapani
In Trapani, potatoes and peppers are added to the caponata. This version is usually served as a main course with bread.Caponata alla Agrigento
Caponata from Agrigento includes eggplant, yellow and red peppers, tomatoes, onion, celery, white or black olives, capers, vinegar, oil, salt and sugar. It’s often served as a side dish or topped with bruschetta.Caponata alla Messina
Caponata from Messina is made with eggplant, tomatoes, onions, and peppers. It’s typically served as a side dish or as a topping for pasta.Light Eggplant Caponata Recipe (NO FRYING)
You can make a light version of the caponata recipe, without frying the eggplant.Sauté the onion and celery together in a frying pan. Add the chopped eggplant. Add oil if necessary (eggplant tends to absorb a lot of oil).
Season with salt and pepper to taste, stir and cook covered on a low heat for about 15-20 minutes.
Add the capers, olives and tomato passata. Stir and simmer for 15 minutes. Meanwhile, dissolve the sugar in the vinegar.
Finally, add the pine nuts and sweet and sour sauce. Turn up the heat and cook for a few minutes until the vinegar scent has evaporated. Turn off the flame and your light eggplant caponata is ready!
Reference:
https://www.recipesfromitaly.com/caponata-recipe-authentic-sicilian-version/
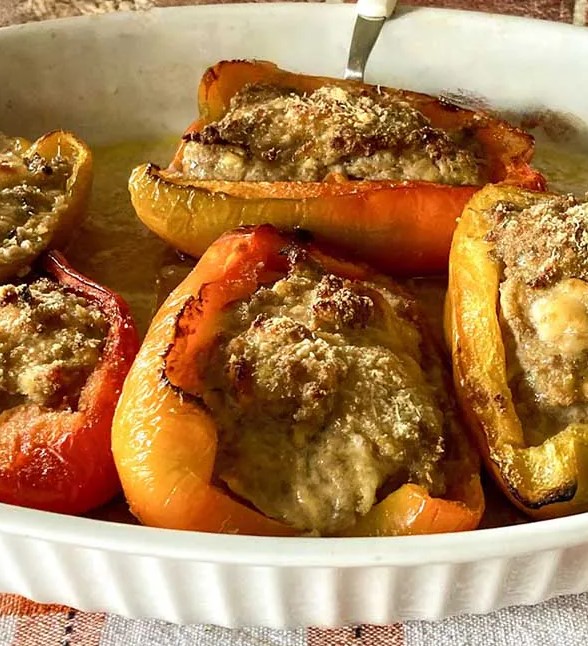
Peperoni ripieni (con salsiccia) - Italian stuffed peppers (with sausage)
Italian stuffed peppers is a traditional dish, typical of the southern Italian regions.Peppers are a vegetable native to North and Central America that was brought to Europe by Christopher Columbus in 1493. These vegetables love warm weather, so their cultivation has developed considerably throughout the Mediterranean. Peppers have become part of many regional recipes, especially in southern Italy.
Ingredients:
- 2 or 3 bell peppers (depending on size) of mixed colors: yellow, green and red
- 350 g (3/4 pound) of ground beef
- 150 g (5 oz) of sausage
- 80 g (2,5 oz) of stale bread or bread loaf
- 100 ml (1/2 cup) of milk
- 80 g (~ 1 cup) of grated Grana Padano cheese or Parmigiano Reggiano
- 150 g (5 oz) of provolone or mozzarella
- 2 whole eggs
- 1 tablespoon of chopped parsley
- 3 tablespoons of extra virgin olive oil
- fine salt to taste
- ground black pepper to taste
- In a bowl, soak the bread in the milk. Let it soak until completely softened (about 5 minutes).
- Meanwhile, place the ground beef and sausage (skinless) in another bowl. Start working the meat to mix it together. You can do this with your hands, which is definitely more practical, or with a fork.
Now add the eggs. - Add the bread – well squeezed out of the milk – and mix well.
- Finally add the grated Parmigiano and the diced Provolone (or Mozzarella). If you are using mozzarella cheese, be sure to drain it well.
- Finally, add the chopped parsley and season with salt and pepper.
Mix all ingredients well. The filling is ready; set aside. - Meanwhile, wash and dry the peppers. Then cut them in half lengthwise.
Remove the seeds and internal threads from the peppers. Salt them and lightly grease the inside. - Fill the peppers generously with the filling and place them in an oiled baking dish. Press the stuffing well into the peppers.
Drizzle with a little oil and sprinkle with a little Parmigiano cheese. - Bake in a preheated oven at 180°C (356°F) for about 40 minutes. The cooking time depends on the size of the peppers. The larger they are, the longer they need to cook.
At the end of the cooking time, turn on the grill and cook for an additional 5 minutes. This will create a delicious and inviting golden and crispy crust on the surface.
Remove from the oven and let stand at room temperature for 10 minutes before serving.
Italian Stuffed Peppers are done! Serve hot or at room temperature.
Stuffed Peppers with Vegetables (No Meat) Neapolitan-style
Neapolitan-style stuffed peppers with olives and breadcrumbs.
Neapolitan stuffed peppers are the ones with the oldest tradition. This recipe does not call for rice or meat because it was born as a dish of the Italian cucina povera.
So they filled the peppers with what they had: stale bread, anchovies, capers, eggplant, a few olives and whatever was left over from meals. This is how the famous and amazing recipe for “Puparuoli ‘mbuttunati” (“stuffed peppers” in the Neapolitan dialect) was born.
Later came other recipes for stuffed peppers. Each family guards its own recipe and this gives rise to numerous versions.
Stuffed Peppers with Vegetables (No Meat) Sicilian-style
Sicilian-style stuffed peppers with olives and capers.
Stuffed Peppers with Vegetables (No Meat) suggestions
In fact, as we will see in the following section, the meatless version of stuffed peppers is the oldest in Italy.
Stuffed peppers without meat generally use breadcrumbs or rice or mashed potatoes or mashed chickpeas as a base for the filling.
Then you add seasonal vegetables such as zucchini, eggplant, and peas.
You can also enrich the stuffing with cheese or tuna in oil.
Reference:
https://www.recipesfromitaly.com/italian-stuffed-peppers/
Funghi ripieni di salsiccia - Sausage stuffed mushrooms

Ingredients:
- 12 Champignon or Portobello Mushrooms
- 150 g (5 oz) of sausage
- 80 g (3/4 cup) grated Parmigiano cheese
- 2 slices of white bread
- 60 ml (1/4 cup) of milk
- 1 tablespoon extra virgin olive oil
- 1 tablespoon of chopped fresh parsley
- 2 cloves of garlic
- salt and pepper
Method:
- NOTE: When preparing stuffed mushrooms, choose mushrooms of the same size. As for the types of mushrooms, you can use the precious porcini mushrooms to make a refined dish suitable for a special occasion.
- First separate the mushroom caps from the stems, taking care not to break them as they will serve as containers for the filling.
Remove the end of the stems with the earth still attached by cutting it off with a sharp knife. - Clean the mushroom caps of any remaining soil by gently rubbing them with a damp cloth or soft brush.
Set aside the clean part of the stems that will be used to make the stuffing. - Now finely chop the cleaned mushroom stems.
Then remove the skin from the sausage and cut it into pieces. Set aside. - In a bowl, soak the bread in milk.
Meanwhile, in a frying pan sauté two cloves of garlic in a tablespoon of oil for 2 minutes on low heat. Then add the mushroom stems. - and the sausage. Cook over high heat for about 5 minutes so that the sausage browns all over. Stir occasionally. Finally season with salt and pepper.
When the sausage is cooked, transfer it to a bowl. Then add the bread squeezed out of the milk. - Now add chopped parsley and grated Parmigiano cheese. Mix all the ingredients well.
- In a greased baking dish, arrange the mushroom caps. Using a teaspoon, fill them with plenty of filling.
Drizzle with a little oil and bake at 180°C (356°F) for about 20 minutes. The last 2-3 minutes switch to grill mode to gratin better.
Let the sausage-stuffed mushrooms cool a bit before serving. - You can serve them as a main course if the mushrooms are large and contain quite a bit of stuffing. On the other hand, if the mushrooms are small, they can be a tasty appetizer, also ideal for a buffet dinner or as a fine side dish. You can eat them in one bite!
Vegetarian Stuffed Mushrooms
If you want to make lighter, vegetarian stuffed mushrooms, replace the sausage with about 400 g (1 2/3 cups) of cow or sheep ricotta cheese.
Or, instead of sausage, you can use vegetables such as cooked and chopped spinach or broccoli. Enrich with stringy cheeses such as Provola or Caciocavallo.
Another excellent variation is mushrooms stuffed with potatoes, boiled and mashed. These, mixed with Parmigiano cheese, make a creamy and delicious filling that everyone loves!
Reference:
https://www.recipesfromitaly.com/sausage-stuffed-mushrooms/
Sformatini di tagliatelle - Tagliatelle pasta muffin nests

Ingredients:
For the sauce
- 200 g tomato pulp or passata
- 8 cherry tomatoes (cut in half) I like to use fresh tomatoes as well but you can just use pulp or passata
- 1 onion peeled and finely chopped
- 1/2 fresh red chili pepper (peperoncino) cleaned of seeds and finely chopped
- 30 g green olives chopped ( I used taggiasche)
- 3 tbsp extra virgin olive oil
- 3 eggs
- 100 ml cooking cream (thick double cream)
- 30 g Pecorino cheese grated
- 1 tbsp chives chopped
- 400 g tagliatelle I used fresh from Giovanni Rana
- 125 g mozzarella 1 ball
- butter for the muffin molds
- salt for pasta and to taste
Make the sauce
- Heat 3 tbsp of extra virgin olive oil in a frying pan or skillet and add the chopped onion and chopped peperoncino.
- When the onion has softened add the tomato passata, cherry tomatoes and olives. Salt to taste and continue cooking for about 15 minutes over a low heat, stirring occasionally with a wooden spoon until the cherry tomatoes have broken down.
- Put a saucepan of water on to boil for the pasta. Add salt once it starts to boil and bring to the boil again. Add a tablespoon of oil to prevent the pasta sticking together and cook the pasta very al dente according to the instructions on the packet. Fresh tagliatelle only needs about 1 minute to cook so you literally only need to blanch it!
- Drain the pasta well and put it in the pan with the tomato sauce, mix the pasta and sauce carefully together and keep aside in a warm place.
- Break the eggs into a bowl and beat them lightly with a pinch of salt; add the cream, grated pecorino cheese and chives. Mix all the ingredients together.
- Butter the bottom and sides of each mold in a 12 muffin tin and fill them with the tagliatelle and sauce. Pour some of the egg and cream mixture onto each muffin nest and lightly tap the tin on a work surface to make the contents settle. Complete with a couple of diced mozzarella pieces on top of each muffin nest.
- Place the tin in a preheated oven at 180 ° and cook for about 20 minutes, or until a light golden crust has formed on the nests. Remove the tin from the oven, let it cool slightly then extract the nests and serve sprinkle with a few more chives and some fresh basil. (you can also serve with a sprinkling of peperoncino flakes).
You can be creative with these pasta muffin nests and use different sauces such as bolognese. You can also use spaghetti instead of tagliatelle!
Reference:
https://www.the-pasta-project.com/tagliatelle-pasta-muffin-nests/2/
https://www.the-pasta-project.com/tagliatelle-pasta-muffin-nests/
Involtini di Melanzane - Eggplant Rollatini
summer vegetarian recipe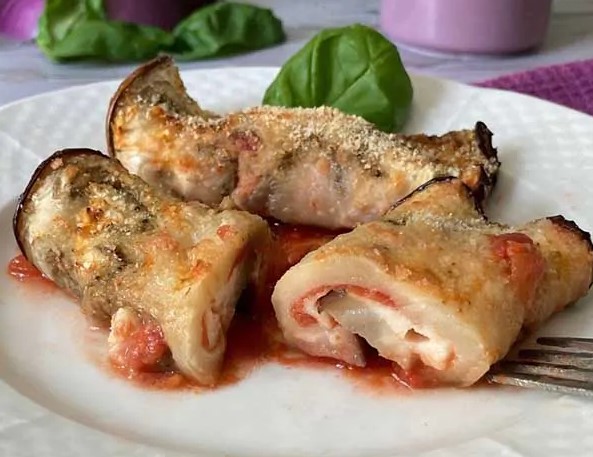
Ingredients:
- 1 big Eggplant
- 250 g (8 oz) of Mozzarelle
- 60 g (1/2 cup) of grated Parmigiano cheese
- 2 tablespoons of breadcrumbs
- 225 g (1 cup) of tomato pulp (canned or made from fresh tomatoes)
- 4 tablespoons of Extra virgin olive oil + more to season
- fine salt
- 10 fresh basil leaves + more for decoration
- In a frying pan pour a drizzle of extra virgin olive oil and add the tomato pulp. You can use canned peeled tomatoes. Or use fresh, ripe tomatoes, peeled and seedless.
Cook for about ten minutes, then add the basil leaves and season with salt. Keep aside. - Meanwhile, wash and dry the eggplant. Remove the stem. Then cut it into very thin slices (about 3-4 millimeters or 1/8 inch thick).
The thickness of the slices is important. The thinner they are, the easier it’s to roll them up to make the rollatini.
Arrange the eggplant slices on a baking sheet covered with baking paper. With a brush, grease the eggplant slices with extra virgin olive oil. Finally salt lightly. - Bake at 180°C (356°F) for about 10 minutes. After this time, remove the eggplant slices from the oven and allow to cool.
This step is very important. It’s a precooking to make the slices softer to roll. It also helps to dry out the vegetable water that can make the eggplant bitter. - Cut the mozzarella into thin slices. If the mozzarella releases a lot of liquid during cutting, let it drain and dry as much as possible. Finally start making the eggplant rolls.
- On each eggplant slice place a spoonful of tomato pulp. Then add one or two slices of mozzarella cheese.
- Finally roll the eggplant slice on itself to form the roulade. Prepare all the rolls and set aside. Now you need to get the baking dish ready to bake the eggplant roll-ups.
- In a baking dish, pour a drizzle of extra virgin olive oil. Then add 3-4 tablespoons of tomato sauce and cover the entire bottom. Lastly lay the rolls on top next to each other and sprinkle with plenty of grated Parmigiano cheese.
- Add a few basil leaves. Finally, add a drizzle of oil and sprinkle with breadcrumbs.
- Bake in a preheated oven at 200°C (390°F) for about 10 minutes.
Turn on the grill function for the last 2-3 minutes to get a crispy crust on the surface of the rolls.
Remove from the oven and allow to cool slightly. Before serving the eggplant rollatini, add a few leaves of fresh basil.
Eggplant Rolls with Caciocavallo
To make more flavorful eggplant rolls, you can replace mozzarella with caciocavallo cheese.
Caciocavallo is a very tasty cheese, used especially in southern Italian regions to flavor many local dishes.
Eggplant Rollatini with Ham
We have shown you a fairly simple and delicate version, which can be a side dish or an appetizer.
But if you also add a slice of ham to the roulade, you will get a richer and more nutritious dish.
Eggplant Rollatini without Tomato
Eggplant rollatini are often made without tomato. That is, “in bianco” (white, as opposed to the red given by the tomato), as we would say in Italy.
The filling varies greatly from region to region. The classic filling consists of ricotta and prosciutto. Or ricotta and spinach.
In Sicily, for example, it’s very common to stuff eggplant roulades with chopped breadcrumbs, anchovies in oil, raisins and pine nuts.
Fried Eggplant Rolls
If you want to make very tasty and appetizing eggplant rolls, you can change the cooking method and fry them.
Fry not only the freshly floured eggplant slices, but also the rolls.
When the eggplant slices are fried, let them cool. Then stuff them with tomato pulp and mozzarella cheese (or other filling of your choice) and roll them up.
Now dip them in beaten egg and then in breadcrumbs. Fry them in plenty of oil in a frying pan or deep fryer.
You can enjoy them as crispy as they are or lay them on a plate over a tomato sauce.
This is a really tasty version but definitely not a light one. Probably not very suitable for summer, but still worth a try!
Reference:
https://www.recipesfromitaly.com/eggplant-rollatini-recipe/
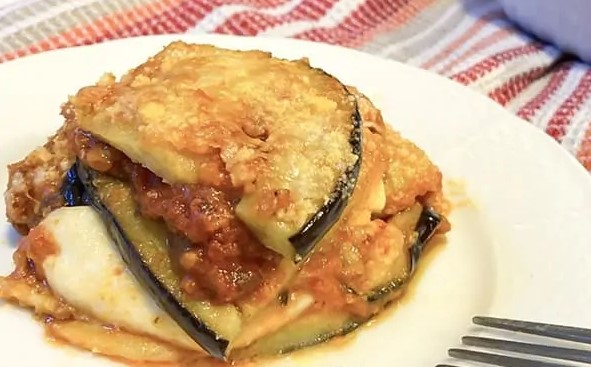
Parmigiana di Melanzane - Eggplant Parmigiana
The origin of eggplant parmigiana recipe is the subject of historical disputes between Campania, Sicily and Emilia-Romagna.
Ingredients:
- 2 medium eggplants
- 600 ml (about 3 cups) of Tomato Passata
- 100 g (3/4 cup) of all purpose flour
- 300 g (about 3 cups) of grated Parmigiano cheese
- 300 g (10,6 0z) of fresh Mozzarella cheese
- 500 ml (2 1/3 cups) of extra virgin olive oil
- some fresh basil leaves
- 2 cloves of garlic
- a handful of coarse salt
- fine salt and ground black pepper to taste
Method:
- To make eggplant parmigiana, first thing wash the eggplants then dry them. Cut them into slices lengthwise to a thickness of about 5 mm (about half inch). Place them on a plate and sprinkle with a little coarse salt to make them lose their bitter water. Cover and let them loose their water for at least 30 minutes.
- Meanwhile, prepare the tomato sauce. Put three tablespoons of extra virgin olive oil and the Tomato Passata in a saucepan. Cook over low heat with the lid closed for about half an hour with a few basil leaves and two cloves of garlic. Add a pinch of fine salt and a little ground black pepper to taste.
- Rinse the eggplants to remove the salt and dry them very well.
- Now flour the slices one by one and then fry them in plenty of oil. Remove the eggplant slices when they are nicely browned and dry up excess oil on paper towels.
- And now we can make Eggplant Parmigiana. Take a baking dish and place 3 or 4 tablespoons of tomato sauce on the bottom. Arrange the first layer of fried eggplants.
- Place a few slices of mozzarella and sprinkle 2 or 3 tablespoons of Parmigiano cheese. Now repeat the layers until you finish all ingredients. So, first put a few tablespoons of tomato sauce
- then another layer of eggplant and always cover with mozzarella and Parmigiano. Finish the last layer with tomato sauce and grated Parmigiano.
- Preheat the oven to 180°C (350 F) and bake for about 30 minutes. In the last 3 minutes set the oven to grill mode and brown the top. Let cool eggplant Parmigiana for 10 minutes before serving. Add few fresh basil leaves on top for decoration.
Parmigiana with Grilled Eggplants
Traditional eggplant parmigiana recipe is made with fried eggplants. Anyway, it’s possible to make it in a lighter version. Light eggplant parmigiana in fact wants grilled eggplants.
You can even replace mozzarella with ricotta. Ricotta is certainly lighter and less caloric than mozzarella cheese. Ricotta will give your dish an equally good taste.
Individual Eggplant Parmigiana
If you prefer, you can make eggplant parmigiana for just one person. In this case you might need a single-portion baking dish to put in the oven and bring directly to the table.
So you need to cut the eggplants round, in the direction of the width, and alternate fried eggplants, slices of mozzarella, tomato sauce and parmigiano, forming a sort of tower, based on the depth of the container.
This way of presenting the dish is more elegant and original. Perfect for dinners with friends, you can easily freeze them still raw and defrost as needed before baking. Eggplant Parmigiana, in this single portions, can be served even as a second course or as a tasty appetizer.
Reference:
https://www.recipesfromitaly.com/eggplant-parmigiana-recipe/
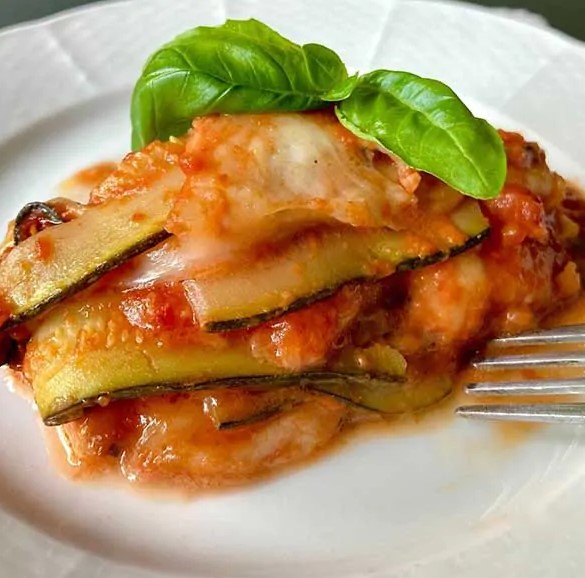
Parmigiana di zucchine - Zucchini parmesan
Ingredients:
- 700 g (1 1/2 pound) of zucchini
- 250 g (1/2 pound) of Mozzarella or Buffalo Mozzarella (as you prefer)
- 100 g of grated Parmigiano Reggiano cheese
- 400 ml (1 2/3 cups) of Tomato Passata
- 6 to 8 fresh basil leaves
- 1 clove of garlic
- 3 tablespoons of extra virgin olive oil
- fine salt to taste
- freshly ground black pepper to taste
- Start the preparation of the no-fry zucchini parmesan by washing and trimming the ends of the zucchini. Then, with the help of a potato peeler, slice the zucchini lengthwise. Make thin slices of about 5 mm (1/5 inch).
- Then line a baking sheet with baking paper and arrange the zucchini slices. Add a drizzle of oil and a little salt and pepper. Put them in the oven, preheated to 180°C (356°F), for about 10-15 minutes, turning them halfway through cooking.
- Meanwhile make a tomato sauce. So, in a saucepan, sauté the garlic clove in the oil. Then add the tomato passata and two basil leaves. Season with salt and pepper to taste. Finally cook over low heat for 15 minutes, covered with a lid.
- Now cut the mozzarella into fairly thin slices. It’s very important to drain the water from the mozzarella very well before using it.
Then, if you have not already done so, grate the parmigiano cheese.
Now you have all the ingredients ready: baked zucchini slices, tomato sauce, sliced mozzarella and grated parmigiano. - Cover the bottom of a baking dish with a little tomato sauce. Arrange an even layer of zucchini, on top put some slices of mozzarella.
- Add plenty of grated Parmigiano, some more tomato sauce, and finally some chopped basil leaves (broken up with your hands).
- Continue making layers as described above. Finish the last layer with mozzarella, Parmigiano and a few basil leaves. Add a drizzle of oil.
- Bake no-Fry Zucchini parmesan in a preheated oven at 350°F (180°C) for about 30 minutes. Remove from the oven and let the zucchini parmigiana rest for at least 15 minutes before serving.
You can eat zucchini alla parmigiana while still warm or at room temperature, depending on your tastes and the season.
Another trick is to let the zucchini parmigiana rest at least 15 minutes before serving.
As it cools a bit, the ingredients, especially the melted mozzarella, will compact and take on the right consistency.
It’s never a good idea to cut and eat parmigiana while still hot, right out of the oven. That’s why they say that the next day is even better!
Zucchini Parmesan without Tomato Sauce
Very popular in Italy is also the recipe of zucchini parmigiana “in bianco”, that is without tomato.
Substitute the tomato sauce with a not so thick béchamel. Often in this variant they add slices of ham.
No-Fry Zucchini Parmesan with Ricotta
To have an even lighter no-fry zucchini parmesan, substitute mozzarella cheese for the ricotta.
Like mozzarella, ricotta cheese must be well drained from its whey.
Ricotta is certainly less caloric than mozzarella.
Easy Baked Zucchini Parmesan with Caciocavallo Cheese
If you like stronger flavors, you can use other cheeses that are more flavorful than mozzarella. Many people use caciocavallo or other stringy cheeses, such as scamorza.
Traditional Italian Zucchini Parmigiana (with Fried Zucchini)
The traditional zucchini parmigiana recipe calls for frying the zucchini. In this recipe we have shown you the lighter version, with zucchini baked in the oven.
If you want to make the traditional recipe, here’s how you need to do it.
Many people dip the zucchini first in white flour and then fry them.
In some recipes you will also find zucchini dipped first in eggs and then in bread crumbs. This is certainly a richer and tastier version, which you can consider a single dish.
In fact, pan-fried breaded zucchini is already a finished dish, a really tasty and crispy side dish. Absolutely a must try!
If you use the breaded zucchini to make the parmigiana layers, your dish will be irresistible but certainly not dietetic!
Mini No-Fry Zucchini Parmesan
If you prefer, you can make the zucchini parmigiana for just one person. In this case, you may need a a single-portion baking dish to put in the oven and bring directly to the table.
We recommend to cut the zucchini round, widthwise. This mini zucchini parmesan can also accompany an aperitif or can be served as a tasty appetizer in buffet dinners or parties.
Reference:
https://www.recipesfromitaly.com/no-fry-zucchini-parmesan/
Pomodoro gratinato - Tomato Gratin
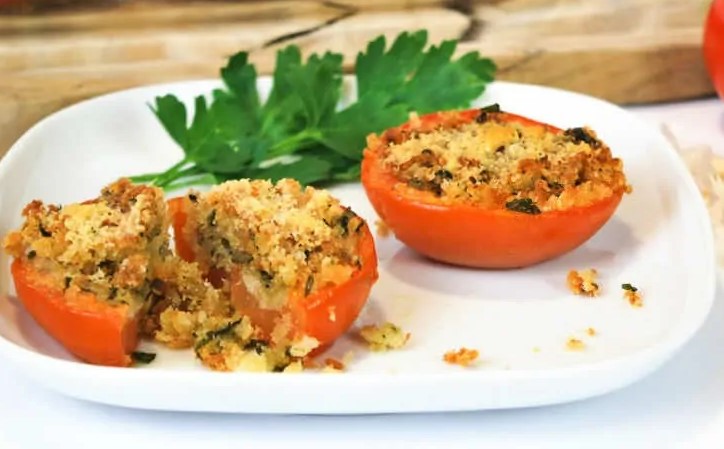
Ingredients:
- 8 ripe round and firm tomatoes
- 250g (9oz) of bread
- 5 tablespoons of grated Parmigiano cheese
- 3 tablespoon of chopped parsley
- half garlic clove
- 1 cup of extra virgin olive oil
- salt and pepper
- Wash tomatoes and cut them in half. Remove their seeds, salt them and place them upside down to drain in a colander. Meanwhile, prepare the aromatic breading: finely chop the bread and add the chopped parsley.
- Chop finely the garlic and add it to the mixture. Season with salt and pepper. Finally, add a cup of extra virgin olive oil and stir. Wash the tomatoes to remove the excess salt and fill them with the mixture, pressing lightly.
- Arrange them in a baking dish side by side. Sprinkle with Parmesan cheese, drizzle with a little olive oil and place in a preheated oven at 180° (350F) covered with an aluminum foil for 30 minutes. After 30 minutes remove the aluminum foil and bake in the oven for 10 minutes.
Serve Tomato Gratin hot or cold, as a main course or as a side dish with meat.
Reference:
https://www.recipesfromitaly.com/tomato-gratin-recipe/
Zucchine Fritte Impanate - Fried Breaded Zucchini
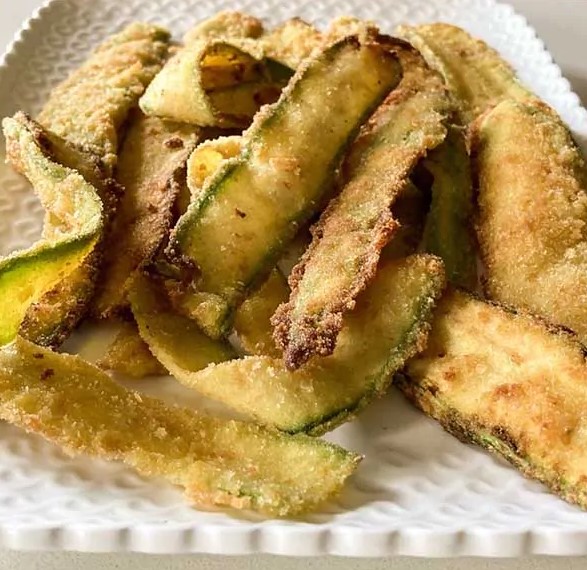
Ingredients:
- 3 medium zucchini, about 600 g (1,3 pound)
- 200 g (1 1/3 cup) of breadcrumbs, preferably dry
- 2 whole eggs
- fine salt to taste
- 400 ml (1 2/3 cup) of peanut oil or canola oil for deep-frying
Method:
- Wash the zucchini and cut off the ends.
- On a cutting board and using a potato peeler, slice the zucchini. Make thin slices about 5mm thick (1/5 inch).
- In a dish, beat the eggs with a fork. Then add a pinch of fine salt to taste. Now dip in the zucchini slices. Turn them several times so that they get wet well, on all sides. Leave them in the beaten eggs for a few minutes.
- To make the breadcrumbs you can use stale bread. If you don’t have dry bread, you can also use breadsticks, saltine crackers or taralli, or use slices of pan carrè as long as they are dry or toasted.
We made a mix of stale bread, breadsticks and Italian taralli to make the breadcrumbs even tastier and crispier.
Place in the food processor and grind on full power for a few minutes, until you get the consistency you want. We preferred a coarse consistency.
You can season your breadcrumbs with salt and pepper. - Now take the zucchini slices one at a time and place them in the breadcrumbs. Cover each side well and press down with your hands or a fork to make the bread stick nicely.
- Heat plenty of oil in a frying pan or deep fryer. Place the zucchini a little at a time, turning 2 or 3 times until golden brown and crisp on both sides.
Using a skimmer, drain the zucchini. Place them on paper towels to remove excess oil.
Place the fried breaded zucchini in a serving dish and lightly salt if necessary. Serve hot.
Crispy Parmesan Fried Zucchini
In the breadcrumbs, in addition to salt and a little ground black pepper, you can also add some grated Parmigiano cheese (1/2 cup), to add even more flavor to your fried breaded zucchini.
Many people also like to add some chopped herbs, such as parsley or mint.
Breaded Baked Zucchini Slices
For a lighter variation, you can bake the breaded zucchini in the oven.
Place the breaded zucchini slices on a baking sheet covered with baking paper. Drizzle them with extra virgin olive oil and bake in a preheated oven at 200°C (390 F) for about 15 to 20 minutes, until golden brown.
Lightly salt if necessary and serve.
Fried Breaded Zucchini (Breading Without Eggs)
If you prefer NOT to use eggs, we have two alternative methods.
“Oiled” water method: prepare a small bowl with 200 ml (about 1 cup) of water and 3 tablespoons of oil. Brush the surface of the zucchini before passing them in the breadcrumbs.
Procedure for the “batter”: mix a little flour with water and a pinch of salt. Completely immerse the zucchini slices. Drain the excess batter and then dip them in the breadcrumbs.
Fried Zucchini alla Palermitana
This breading is made with breadcrumbs flavored with grated Caciocavallo cheese, chopped black olives, garlic, parsley and capers from the island of Pantelleria.
This type of breading is very tasty. It’s used a lot in Sicily not only for zucchini but also for other vegetables such as eggplant and also for meat cutlets.
Reference:
https://www.recipesfromitaly.com/fried-breaded-zucchini/
Zucchine Ripiene al Tonno - Tuna Stuffed Zucchini

Ingredients:
- 4 medium zucchini
- 200 g (7 oz) of tuna in olive oil
- 60 g (3/4 cup) of grated Parmigiano cheese
- 3 anchovies in olive oil
- 1 whole egg
- a sprig of parsley
- 80 g (2/3 cup) of breadcrumbs
- 2 tablespoons of extra virgin olive oil
- salt and pepper to taste
Method:
- Wash the zucchini and remove the ends.
Then BOIL them in plenty of water for about 6 to 8 minutes so that they are firm but still soft inside.
Drain and leave to cool. If you cannot wait, you can quickly cool them in cold water.
Cut them in half lengthwise with a knife. You will get two “boats” from each zucchini.
PLEASE NOTE: We recommend medium to small zucchini, about 12 to 15 cm (5 to 6 inch). If they are longer, you can cut them in half to get four “boats” from each zucchini. - Use a spoon or small digger to scoop out the flesh of the zucchini. Place it in a bowl. Be careful not to dig too deep or the zucchini will become too thin and break.
We don’t recommend using the whole inner part of the zucchini. Half is enough. Otherwise you will get a filling that is too watery. - Now add the tuna. Stir with a spoon or fork to crumble the tuna as much as possible.
- Chop the anchovies and add them to the mixture with the Parmigiano Reggiano and the egg. Mix everything well.
- Finally, add almost all the breadcrumbs to give more texture to the filling (set aside about 2 tablespoons) and chopped parsley for a touch of freshness. Mix very well with a spoon.
- Fill the zucchini boats with the stuffing. Use a spoon to compact the zucchini so that the filling doesn’t overflow during cooking. Place the tuna stuffed zucchini in a baking dish lightly greased with a tablespoon of oil.
- Sprinkle each zucchini with a little bread breadcrumbs and a drizzle of extra virgin olive oil. This will serve to form a crispy, golden crust during baking.
- Bake in a preheated, ventilated oven at 180°C (350°F) for about 30-40 minutes. Allow to stand for a few minutes before serving, as the filling will compact a bit when it gets warm.
There you go, your tuna stuffed zucchini are done! They are great cold or hot, depending on your taste and the season.
Note:
If you like, you can also change the filling to suit your taste. Here are a few suggestions that work well with tuna.
For example, you can add some olives or chopped capers, typical Mediterranean ingredients that are very good in this recipe.
You can also vary it with your favorite herbs and spices.
Instead of parsley, try oregano or basil.
If you like spicy flavors, add some fresh or powdered hot chili peppers.
Very interesting is the addition of a little grated lemon zest. This adds a fresh and aromatic flavor ideal for summer dinners.
You can also add diced mozzarella to the filling for a richer dish with a delicious stringy effect.
We recommend draining the mozzarella well before adding it to the filling.
Stuffed Zucchini with Fresh Tuna
In the above recipe, we recommend using tuna in oil. It’s certainly very tasty and gives dishes an unmistakable and very appetizing flavor.
It’s also very convenient! Who doesn’t have a can of tuna in oil at home for quick recipes or a last-minute salad?
But if you are a real fish lover, and tuna in particular, you can also use FRESH TUNA.
Certainly, the dish will be more delicate and you will have to make some changes to the recipe, mainly in the cooking.
We offer two ideas, the first with fresh cooked tuna and the second with raw tuna.
Method 1) – Boil the zucchini for 5 minutes and remove the pulp. Continue cooking in a pan with a little oil and garlic for another 5 minutes, turning them on both sides and salting them lightly.
While the zucchini boats are cooling, prepare the filling: in a bowl, put the zucchini pulp, breadcrumbs, grated Parmigiano and parsley (or other herbs you prefer), salt and pepper to taste.
Instead of the egg, add a boiled potato and mash it with a fork. This way the filling does not need a long cooking time.
Dice the fresh tuna and add it to the filling.
Stuff the zucchini and bake at 180°C (350°F) for 8-10 minutes. Fresh tuna should not be cooked for a long time so as not to lose its tenderness.
Method 2) – Cook the zucchini in boiling salted water for 10 minutes.
Cut in half lengthwise and leave to cool.
Remove the inside pulp, but DO NOT use it for the stuffing.
Fill the zucchini boats with a tartar of VERY FRESH raw tuna seasoned with extra virgin olive oil, chopped capers, chopped cherry tomatoes and a little lemon juice, salt and pepper to taste. Serve.
This is a more summery version that brings out all the flavor and delicacy of fresh tuna.
Sicilian Tuna Stuffed Zucchini
The most unique version of stuffed zucchini with tuna is certainly the Sicilian one.
In Southern Italy, especially in Sicily, it’s very common to add sweet ingredients to savory dishes. The combination of sweet and savory makes the dishes very special.
Raisins, pine nuts, almonds, orange zest, and fennel are typical ingredients in many Sicilian savory dishes, such as sarde a beccafico and the delicious pasta con le sarde.
There is no precise and unique recipe for Sicilian tuna stuffed zucchini, because each area has its own.
We suggest omitting the Parmigiano and adding raisins and some grated orange zest.
You can also replace the parsley with chopped wild fennel or fennel seeds.
In this way you will have zucchini stuffed with tuna, with typical Sicilian flavors, where the sweet and the salty come together to perfection!
Reference:
https://www.recipesfromitaly.com/tuna-stuffed-zucchini-boats/
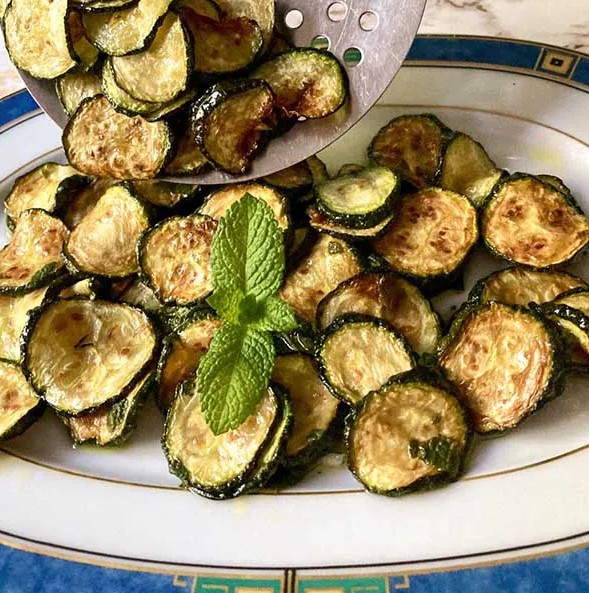
Zucchine alla Scapece - Fried Zucchini with Mint and Vinegar
Many trace the origins of the Zucchine alla Scapece recipe back to ancient Rome, where it was created by the same cook after whom it’s named: Marcus Gavio, nicknamed Apicio.
Ingredients:
- 500 g (1,1 pound) of zucchini
- 1 liter (4 cups) of extra virgin olive oil. About 70 ml (~1/3 cup) for the marinade and the rest for frying
- 50 ml (~4 tablespoons) of white wine vinegar
- 2 cloves of garlic
- 1 tablespoon of chopped mint
- fine salt to taste
Method:
- To prepare the zucchini scapece, start by cleaning the zucchini. Wash them and cut off the ends.
Then, on a cutting board, cut the zucchini into rounds about 5 mm (1/5 inch) thick, they should not be very thin. - Now you need to dry and drain the zucchini so that they lose as much of their water as possible.
To do this, place the zucchini in a colander and sprinkle them with fine salt, which will help and speed up the release of their water.
Leave to drain for at least 30 minutes. The zucchini are ready to fry when they have a slightly “wrinkled” appearance.
PLEASE NOTE: Traditionally, especially in the summer, the zucchini are left to dry in the sun for about two hours. If you are not in a hurry and have the opportunity, we recommend that you follow this ancient Italian tradition. In this case, it’s not necessary to salt the zucchini.
After 30 minutes, rinse the zucchini under running water to remove some of the salt. - Now dry the zucchini with a kitchen towel. If you dried them in the sun, skip this step.
While the zucchini are drying, prepare the marinade dressing. Chop the mint leaves on a cutting board. It’s best to use a sickle or knife, not an electric chopper. - Peel the garlic cloves, cut them in half and remove the middle core. Then slice them finely.
- Place the chopped mint and garlic in a bowl, add the white wine vinegar and about 70 ml (about 5 tablespoons) of extra virgin olive oil. Stir and set aside.
- In a fairly high-sided frying pan, heat the oil.
Heat until it reaches a temperature between 170°C (338°F) and 180°C (356°F) or until small bubbles begin to form.
Dip the zucchini a few at a time. Use a skimmer to move the zucchini during frying to ensure even cooking. - Remove the zucchini from the oil with a skimmer when they are well colored. This will take about 3-4 minutes.
Leave them on paper towels for a while to drain off any excess oil.
If you dried the zucchini naturally in the sun, do not adjust the salt.
PLEASE NOTE: The fine salt used to remove the water from the zucchini, even if you rinsed it off, will have definitely flavored them, so there is no need to add more salt. - In the bottom of a bowl, place some of the mint and vinegar marinade. Then add a layer of fried zucchini while still hot.
Continue in layers until you run out of ingredients. Leave to rest for at least an hour.
Zucchine alla Scapece are ready! Decorate with some fresh mint leaves and serve.
Oil
Tradition dictates that you use extra virgin olive oil
Salt-dry the Zucchini Before Frying
Another important step is drying the zucchini. These need a slow drying process before they are fried.
Let the Zucchini Sit in the Marinade Before Serving
Another important step is to let them rest after seasoning the zucchini with the marinade made of vinegar, oil, mint and garlic.
The authentic recipe for zucchini alla scapece calls for a minimum of four hours or even a full night’s marinating time.
This reposing allows the ingredients to blend and the zucchini to absorb all the flavors and aromas well.
One or two hours may well be enough, but no less if you want the scapece zucchini to acquire their characteristic flavor!
Mint or Basil
If you don’t like the taste of mint, you can substitute it with basil. Basil adds freshness and is great for summer dishes.
Garlic and Vinegar
Garlic is a key ingredient in this recipe, as is vinegar.
You can play with the amounts, adding or reducing them according to your taste.
If you want some acidity, we recommend using apple cider vinegar.
Spicy Scapece Zucchini
If you like a spicy taste, you can add freshly ground black pepper or hot red chili peppers to the marinade.
Frying Pan, Deep Fryer or Air Fryer?
As for the cooking method, the traditional recipe calls for frying. We used a frying pan. But of course, using a deep fryer will not change the success of the recipe.
For a lighter and more modern version of zucchine alla scapece, you can use an air fryer, which still guarantees the crunchiness of the zucchini.
However, the flavor will not be as intense and tasty as the traditional one.
Place the zucchini slices in the basket of the air fryer and drizzle with a tablespoon of oil (preferably from a sprayer), shaking just enough to coat all the slices.
Cook at 200°C (392°F) for about 10 to 15 minutes.
Halfway through cooking, shake the basket and turn the zucchini slightly.
When cooked, transfer the air-fried zucchini to a bowl and toss with the marinade according to the recipe.
Reference:
https://www.recipesfromitaly.com/zucchine-alla-scapece/
Arancini di Riso - Sicilian Rice Balls
It all began during the Arab domination (827-1091), which in 200 years brought culture, poetry, arts, stunning monuments and, in particular, cuisine to Sicily.
Ingredients:
The Rice:
- 500 g (2 3/4 cups) of vialone nano rice
- 1/4 teaspoon of saffron (powder or crushed threads)
- 30 g (1/4 stick) of unsalted butter
- 100 g (1 cup) of grated Parmigiano cheese
- 1,2 liter (5 cups) of water
- 5 g (1 teaspoon) of coarse salt
- 1 little onion
- 1 celery stalk
- 1 medium carrot
- 100 g (3,5 oz) of ground pork
- 100 g (3,5 oz) of ground beef
- 200 ml (4/5 cup) of tomato passata. You can try Italian Passata rustica by Sanniti or make it with our tomato passata recipe
- 100 g (3,5 oz) of peas (fresh or frozen)
- 60 g (2 oz) of caciocavallo cheese or mozzarella
- 50 ml (1/5 cup) of dry red wine
- 2 tablespoons of extra virgin olive oil
- fine salt
- freshly ground black pepper
The Ham and Mozzarella Filling:
- 30 g (1 oz) of ham
- 60 g (2 oz) of mozzarella cheese
For Breading and Frying:
- 200 g (1 1/4 cups) of all purpose flour
- 300 ml (1 1/4 cups) of water
- 1/3 teaspoon of salt
- 300 g (2 3/4 cups) of breadcrumbs
- 2 liters (8 1/2 cups) of oil for frying
Method:
- BEFORE YOU START: First you need to prepare a creamy, starchy rice with saffron. The rice will need to cool, so if you want you can make it the day before and store it in the refrigerator.
You’ll need a high-sided non-stick pan to cook the rice. Add the water and salt. Strictly stick to the doses given. Bring to a boil. Then add the rice.
The rice must completely absorb the water. It’ll take about 15 minutes. This will allow the starch to remain fully in the pot so you’ll get a rather dry and compact rice.
Now dissolve the saffron in very little hot water and add it to the cooked rice. - Mix thoroughly with a wooden spoon, then add the butter cut into small pieces.
- Add Parmigiano and stir. Season with salt if necessary (taste it!). Now you have made a creamy and starchy saffron risotto. Place it on a large plate or tray.
- Level it carefully with a wooden spoon and then cover with cling film (it’ll prevent the rice surface from drying out and crusting). Now the rice has to cool down so let it do it out the fridge for at least 2 hours.
- In a non-stick frying pan, sauté the diced carrot, celery and onion in 2 tablespoons of extra virgin olive oil for 2 minutes.
Then add the ground meat. Cook over high heat, stirring occasionally, for 2 to 3 minutes. - Then add the red wine and let it evaporate over high heat. Finally add the tomato passata.
- Leave to simmer, covered with a lid, for about 30 minutes.
If you are using fresh or frozen peas, add them after about 10 minutes. For canned peas instead, wash them thoroughly and add them after 20 minutes.
If the meat sauce is getting too dry, add 2 tablespoons of water. Season with salt and pepper. The meat sauce is ready. Set aside.
- Place one hand to form a basin, as if you would like to collect water. Put the rice in a palm, flatten it with your other hand, creating a hole. Now place the meat sauce.
- Add 2/3 pieces of caciocavallo cheese or mozzarella, as you prefer. Now close the arancini with more rice. Keep adding rice till you form a ball.
- You can give different shapes to the arancini, depending on the filling, to distinguish them before serving. We chose a conical shape for the arancini with meat sauce and peas, and a round shape for the arancini with ham and mozzarella cheese.
To give the arancini a cone shape, do like this: reach your hands in prayer, with your palms always concave and turn the rice ball in your hands. Doing so, wet often your hands, it’ll be easier. Then, with the lower part of the palms, give a slight push upwards in order to shape the flat base of the arancini.
- Cut ham and mozzarella into small pieces.
- Follow the same steps. Fill the hollow you have created in the rice with prosciutto and mozzarella. Add rice until the rice ball is completely closed.
- Now, with the help of your (wet) hands, give it a round shape.
- Remember that the round or cone shape is only for distinguishing arancini of different flavors. If you opted for only one flavor, of course the ball is the easiest shape.
Once you’ve made all the arancini, you can keep them in the fridge for 2 – 3 days (or freeze them) before frying.
- Make a batter with water, flour and a pinch of salt. Then dip the arancini, one by one, in the batter, taking care to cover them entirely.
Then roll them in the breadcrumbs, pressing lightly with your fingers to make it stick well to the arancini. - For frying, choose a pot with high sides, in which to deep-fry in plenty of vegetable oil (2 arancini at a time) when the oil is ready at 175°C (350 F).
You can find out the perfect temperature with a kitchen thermometer or by dipping a toothpick: if it creates many little bubbles, the oil is ready! - Fry for about 2 minutes or till the arancini take on a golden color. Drain on paper towels and enjoy!
Baked Arancini
- Arancini can also be baked in the oven, at 180°C (356°F) until golden brown. This is a light version with a longer cooking time, around 25 to 30 minutes.
- Prepare the arancini and bread them as indicated in the recipe.
- Place the arancini on a baking pan covered with baking paper. Drizzle them with extra virgin olive oil. Finally bake in the middle rack of the preheated oven.
Note:
Actually, the difference between Palermo’s arancine di riso, arancini alla messinese, arancini alla catanese, and arancini alla ragusana is mainly in shape and size.
In Palermo, for example, they are large and round in shape;
in the Catania area they are smaller, with shapes that identify the filling:
- flat-based and cone-shaped with meat sauce filling;
- round with ham and mozzarella filling;
- egg-shaped with chicken or spinach.
White arancini
White arancini (without saffron), usually stuffed with a filling of ham and mozzarella. Then arancini with saffron like the ones of this recipe, which gives the rice its typical yellow color.
Red arancini
Red arancini are made adding a bit of tomato, usually stuffed with meat sauce.
Vegetarian arancini
Vegetarian arancini are stuffed with vegetables.
Reference:
https://www.recipesfromitaly.com/arancini-recipe-sicilian-rice-balls/
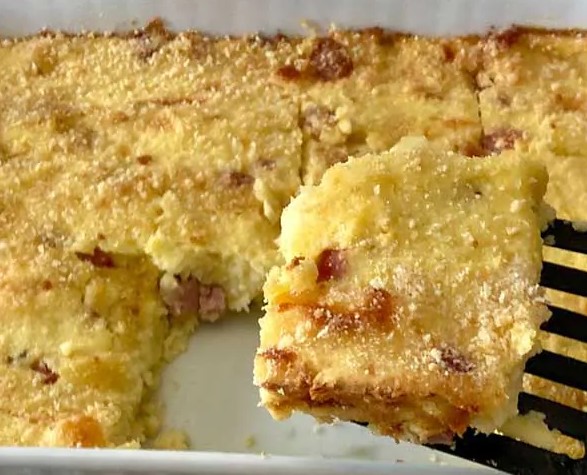
Potato Gateau - Italian Mashed Potato Pie
Gattò di Patate (or Potato Gattò)The origins of this recipe and its name (Gateau or Gattò di Patate) are linked to the history of the city of Naples. Invented by cooks from France for a royal wedding banquet.
Ingredients:
for a 13×9 inch baking dish
- 1 kg (about 2 pounds) of potatoes
- 3 whole medium eggs
- 120 g (4,5 oz) of Mozzarella or Buffalo Mozzarella
- 60 g (1/2 cup) of grated Parmigiano Reggiano cheese
- 60 g (2 oz) of Salami
- 60 g (2 oz) of Ham in a single slice or in little cubes
- 150 g (5 oz) of cheeses, some smoked such as smoked scamorza and some sweeter such as caciocavallo.
- 2 tablespoons of breadcrumbs
- 3 tablespoons of extra virgin olive oil
- fine salt
Method:
- To make the Potato Gateau, start by boiling the potatoes with their skin. Put them in a large pot with plenty of cold water.
Bring to a boil and from now on will take about 30/40 minutes, depending on the size of the potatoes.
Test the softness of the potatoes with a fork. Remove them from the water and let them cool a little but not completely. The potatoes that are still a little warm are softer and you can mash them better.
So peel the potatoes while they are still a warm. - While the potatoes are boiling, prepare the ingredients:
Cut the mozzarella into cubes. Then put them in a colander to drain all the liquid that comes out.
Dice the cheeses
Cut the salami and ham into small cubes. - Mash the potatoes still warm in a bowl with a potato masher.
Now break the eggs into a bowl. Add a little salt and pepper and beat them with a whisk.
Finally add the beaten eggs to the potatoes and mix very well. - When the mixture is well blended you can add the grated Parmigiano and the extra virgin olive oil. Then add ham, salami, mozzarella and the cheeses. Mix throughly all the ingredients.
- Take a baking dish and oil the base. Then add the breadcrumbs on the base evenly, over the entire surface. This step is to prevent the mixture from sticking during cooking and so that you can cut portions more easily.
Then pour the mixture into the pan. - Level and sprinkle the surface of the Potato Gateau with the breadcrumbs and a little more grated Parmigiano. Add also a dash of oil.
- Bake your potato gateau at 180°C (350°F) in a preheated oven for about 40 minutes. Place the baking pan on the middle rack.
Halfway through baking, turn the pan by 180° to help form a crispy crust evenly. If you want in the last 3 or 4 minutes you can turn on the grill, so that the surface becomes even more golden. But be careful that it doesn’t burn!
Take your potato gateau out of the oven and let it cool.
It’s important, if you want to cut a whole slice, that the potato gatto is just warm or cold and not very hot. So let it cool in the pan for at least 30 minutes before serving so that all the ingredients are compacted.
This Italian mashed potato pie recipe is also perfect served cold. So you can cook it even the day before serving.
There is no exact recipe for Italian Gatto di Patate. You can use the cheeses and cold cuts that you prefer or that you have on hand.
The gateau is the ultimate fridge-emptying recipe. To make it you can use the cheeses and cold cuts you have in the fridge that you need to use up.
A tasty variation is potato flan with cheese and sausage that is stringy and delicious.
The more delicate classic version uses only cooked ham and mozzarella cheese.
Vegetarian Potato Gateau
Reference:
https://www.recipesfromitaly.com/potato-gateau/